Guild System/en: Difference between revisions
(Updating to match new version of source page) |
(Updating to match new version of source page) |
||
| Line 4: | Line 4: | ||
== Getting started == |
== Getting started == |
||
[[File:Guild menu.png|thumb|373x373px|Guild Menu]] |
[[File:Guild menu.png|thumb|373x373px|Guild Menu]] |
||
| − | In order to join or create a guild you need to access the in game guild functionality, located |
+ | In order to join or create a guild you need to access the in game guild functionality, located at the top of your client. Clicking on the guild tab, opens the guild menu like the image on the right suggests. |
| − | [[File: |
+ | [[File:Guildtopbar.png|left|thumb|567x567px|Guild Icon]] |
| − | <br> |
||
| − | <br> |
||
| − | <br> |
||
| − | <br> |
||
| − | <br> |
||
| − | <br> |
||
| − | <br> |
||
| − | <br> |
||
| − | <br> |
||
| − | <br> |
||
| − | <br> |
||
| − | <br> |
||
| − | <br> |
||
| − | <br> |
||
| − | <br> |
||
<br> |
<br> |
||
| + | |||
| + | |||
<br> |
<br> |
||
<br> |
<br> |
||
| Line 32: | Line 19: | ||
== Creating a guild == |
== Creating a guild == |
||
| + | [[File:Guildgeneraltab.png|thumb|358x358px|Guild General Tab]] |
||
| − | In order to create a guild, you just need to |
+ | In order to create a guild, you just need to type a valid name and click on that button '''''Create Guild'''''. Upon successfully creating a guild, you will be asked to relog in the game in order to the changes to apply. |
| − | [[File:Guildgeneral.png|thumb|445x445px|Guild general menu. 1. Type the player name that you want to invite and hit "invite player"; |
||
| + | === General Tab === |
||
| − | 2. Same for the invite, but to kick a player; |
||
| + | After creating your guild, the main tab you'll see is the General Tab. The General Tab contains the core information about your guild, as shown in the image to the right. |
||
| + | === Members Tab === |
||
| − | 3. These three buttons are used to promote or demote a player. Use the first button to the left to select a player you wish to promote or demote, then the second button to choose the desired rank and the third button to confirm the promotion/demotion; |
||
| + | [[File:Guildmemberstab.png|thumb|358x358px|Guild Members Tab]] |
||
| + | In the Members Tab, you'll be able to see all of your guild's current members, as well as basic information about them, such as name, level, class, rank and their online status represented by a green skull (online) or red skull (offline). |
||
| + | === Ranks Tab === |
||
| − | 4. Used to change your guild's emblem; |
||
| ⚫ | |||
| + | In the Ranks Tab, you'll be able to see what permissions does each of the existent ranks have, as well as edit what each rank can do and even create new ranks. In case you do not have the permission to edit the ranks, you will not see this tab. |
||
| + | === Inbox Tab === |
||
| − | 5. Setup a message that will appear whenever a player opens guild chat; |
||
| + | In the Inbox Tab, you'll be able to see what activities were registered within the guild overlay, such as members that joined, members that left or got kicked out, war notifications and many others. |
||
| − | |||
| − | 6. Broadcast a message to all guild members that will appear in red on both your screen and on server log. ]] |
||
| − | [[File:Guildmenunumbers.png|thumb|423x423px|Guild menu from the leader's perspective. 1. Used to purchase more guild member space; |
||
| − | |||
| − | 2. Used to disband your guild; |
||
| − | |||
| − | 3. Opens a menu that lists all players in the guild; |
||
| − | |||
| − | 4. Opens a menu that shows all guild member's contributions; |
||
| − | |||
| − | 5. Opens a menu for guild member management and other stuff; |
||
| − | |||
| − | 6.Opens a menu that shows all players that applied to join your guild; |
||
| − | |||
| − | 7. Opens a menu that lists all of your attained guild perks.|left]] |
||
| − | <br> |
||
| − | <br> |
||
| − | <br> |
||
| − | <br> |
||
| − | <br> |
||
| − | <br> |
||
| − | <br> |
||
| − | <br> |
||
| − | <br> |
||
| − | <br> |
||
| − | <br> |
||
| − | <br> |
||
| − | <br> |
||
| − | <br> |
||
| − | <br> |
||
| − | <br> |
||
| − | <br> |
||
| − | <br> |
||
| − | <br> |
||
| − | <br> |
||
| − | <br> |
||
=== Recruiting players === |
=== Recruiting players === |
||
| − | In order to invite players, you need to either invite a player or accept someone that has applied. In order to invite a player, |
+ | In order to invite players, you need to either invite a player or accept someone that has applied. In order to invite a player, you need to be close to their character. Upon doing so, right click or ctrl + right click their character and click on '''''Invite to guild'''''. |
| + | [[File:Guildinvitedropdown.png|thumb|156x156px|Inviting a player|left]] |
||
| − | |||
| − | If a player shows interest and applies to join your guild, you can either accept or decline by clicking the '''''Recruitment''''' tab, like shown in the image below. |
||
| ⚫ | |||
| − | <br> |
||
| − | <br> |
||
| − | <br> |
||
<br> |
<br> |
||
<br> |
<br> |
||
| Line 102: | Line 54: | ||
== Joining a guild == |
== Joining a guild == |
||
| − | [[File: |
+ | [[File:Guildinvitenotification.png|thumb|376x376px|Guild invite notification]] |
| ⚫ | If you have no guild, you can open the guild menu, in the '''''Top Guilds''''' tab and see many guilds available for you to apply. If you apply, the leaders and vice-leaders will decide whether or not they want you to join and can decline your application without reason. Hit the '''''Send Join Request''''' button and a notification will be displayed to the leaders and vice-leaders. |
||
| − | [[File:Guild confirmation.png|frame|Guild invitation]] |
||
| ⚫ | If you have no guild, you can open the guild menu and see many guilds available for you to apply. If you apply, the leaders and vice-leaders will decide whether or not they want you to join and can decline your application without reason. Hit the |
||
| − | |||
| − | If a guild leader or vice-leader wants you to join their guild, they can also invite you directly. When that's done, a message will appear in your screen and in your server log, like this[[File:Guildinvite.png|frameless|527x527px]]. In order to accept, open your guild tab and a menu will pop up, like shown in the image to the right. |
||
| − | <br> |
||
| − | <br> |
||
| − | <br> |
||
| − | <br> |
||
| − | <br> |
||
| − | <br> |
||
| − | |||
| − | == Guild levels and perks == |
||
| − | Guilds can also level up and with that gain several bonuses that helps only those who are part of a guild, if your guild has enough levels, that is. You can earn guild exp by doing daily quests and [[Daily Bosses|daily bosses]] while being in a guild, which will count towards the exp required, located at the guild menu. Perks comes from each level up a guild goes through, and they give bonuses such as: |
||
| + | In case you get invited to a guild, a notification will be displayed in the '''''Inbox''''' tab, as shown in the image. |
||
| − | * %Experience; |
||
| − | * %Elite chance; |
||
| − | * %Damage; |
||
| − | * Max Dungeon Charges; |
||
| − | * %Healing. |
||
Revision as of 21:12, 1 July 2024
Unlike normal guild systems where it's just a way to gather players under a group, BlackTalon has special features that makes guilds much more beneficial.
Getting started
In order to join or create a guild you need to access the in game guild functionality, located at the top of your client. Clicking on the guild tab, opens the guild menu like the image on the right suggests.
Creating a guild
In order to create a guild, you just need to type a valid name and click on that button Create Guild. Upon successfully creating a guild, you will be asked to relog in the game in order to the changes to apply.
General Tab
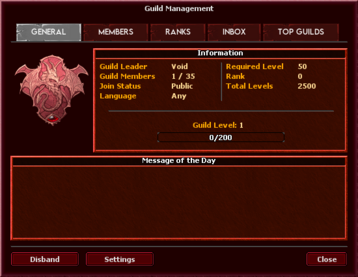
After creating your guild, the main tab you'll see is the General Tab. The General Tab contains the core information about your guild, as shown in the image to the right.
Members Tab
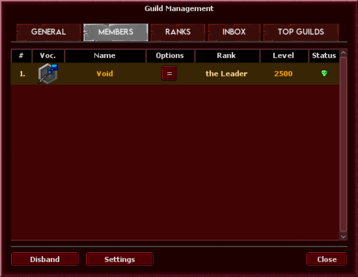
In the Members Tab, you'll be able to see all of your guild's current members, as well as basic information about them, such as name, level, class, rank and their online status represented by a green skull (online) or red skull (offline).
Ranks Tab
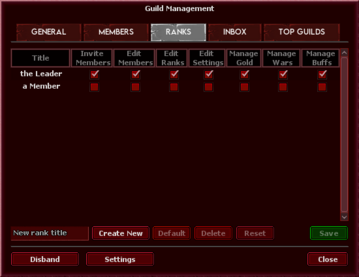
In the Ranks Tab, you'll be able to see what permissions does each of the existent ranks have, as well as edit what each rank can do and even create new ranks. In case you do not have the permission to edit the ranks, you will not see this tab.
Inbox Tab
In the Inbox Tab, you'll be able to see what activities were registered within the guild overlay, such as members that joined, members that left or got kicked out, war notifications and many others.
Recruiting players
In order to invite players, you need to either invite a player or accept someone that has applied. In order to invite a player, you need to be close to their character. Upon doing so, right click or ctrl + right click their character and click on Invite to guild.
Joining a guild
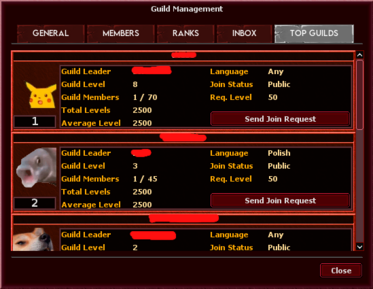
If you have no guild, you can open the guild menu, in the Top Guilds tab and see many guilds available for you to apply. If you apply, the leaders and vice-leaders will decide whether or not they want you to join and can decline your application without reason. Hit the Send Join Request button and a notification will be displayed to the leaders and vice-leaders.
In case you get invited to a guild, a notification will be displayed in the Inbox tab, as shown in the image.


